tSM Studio Help
About the Program
tSM Studio is a powerful VS Code extension that provides essential features for working with Datalite's tSM software platform. It streamlines development, backup, and synchronization workflows for tSM servers.
Key Features
Quick Navigation
- First Launch Guide - Get started with initial setup
- Main UI Elements - Overview of interface components
- Git Integration - Version control for your configurations
- Backup & Synchronization - Data management workflow
- AI Capabilities - Leverage AI tools and MCP integration
First Launch
The following steps are crucial for successful backup and synchronization. Follow them carefully to ensure optimal setup.
0. Prerequisites
First, you need to select a folder where data downloaded from the server will be stored.
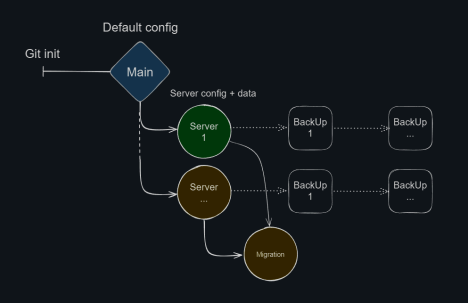
It's highly recommended to initialize Git in this folder immediately:
git init
This allows you to:
- Store data from individual servers in separate branches
- Track changes over time
- Rollback to previous states if needed
Recommended workflow:
- Keep the main branch clean with default configuration
- Create a dedicated branch for each server
- Switch to the server's branch before proceeding with setup
1. Server Setup
Configure the server connection in the extension settings.
The user must have administrator rights on the server if you need to upload data back to the server.
If migrating data between servers:
- Configure connections for all servers involved in the migration
- Test each connection before proceeding
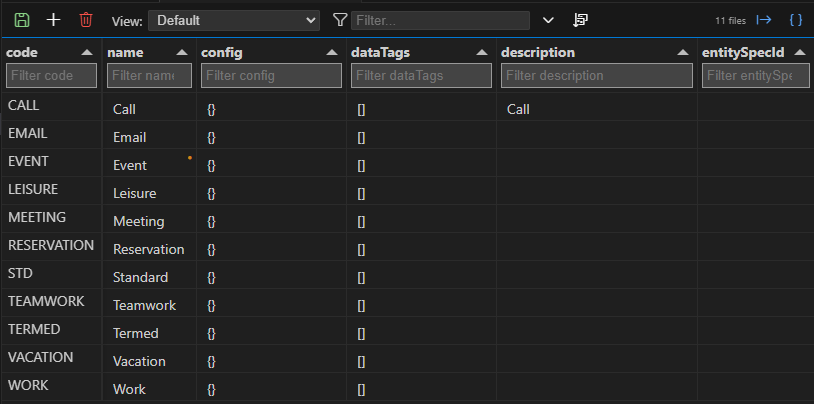
2. Target Configuration
Review and customize the list of targets (entity types for backup and synchronization).
Action items:
- ✅ Review the preset list of entities
- ✅ Remove entities that don't exist on your server
- ✅ Add any missing entities specific to your setup
- ✅ Verify all entities meet the requirements
Pay special attention to the requirements for added entities. Each entity must have a /page API endpoint available. Verify through tSM Public API.
Result: A customized list of entities relevant only to your server.
Main UI Elements

Application Icon in the Action bar - Click to switch VS Code to tSM Studio working mode.
When you click the icon, the extension:
- 🔄 Synchronizes with the local repository
- 🚀 Starts the MCP server (accessible at
http://127.0.0.1:32000/) - 📡 Makes the MCP server available to external applications
Local Files

Panel displaying locally stored records from the server.
Panel Information:
- Updated - Timestamp of the last save from cache to local storage
note
Direct file changes during cache synchronization have no effect
Toolbar:
 Filter by file name
Context Menu Commands
On Folders:

Right-click on a folder → Open Tabular Editor to work with a group of records
On Files:

- Single click - Open in standard edit mode
- Right-click on SpEL files (
scriptType: SPEL) - Open script in edit and validation mode
.tsm-audit.json
Automatically created audit file containing modification history.

Features:
- 👤 Track who modified files
- 📅 See when changes were made
- 🔍 Context menu: "Show user by ID" - Display detailed user information
User information may be unavailable in some cases (e.g., deleted users)
Diff Cache

Purpose: Temporary storage for records downloaded from the server. Shows the difference between local storage and the active server.
Panel Header:
- Server name - Active server from which data is downloaded
- Date, time - Last download timestamp
 Connection status and server URL
Panel Commands
| Icon | Command | Description |
|---|---|---|
| Download ALL to Local | Saves all data from cache to local disk | |
| Upload ALL to Server | Uploads all local data to the server | |
| Clear cache | Clears the cache | |
| Get data from server | Downloads fresh data from server | |
| Open configuration | Opens settings panel | |
| Menu | Create SpEL or TQL query documents |
Menu Options

Output Panel

Purpose: Displays the extension's internal activity log for diagnostics and process monitoring.
How to open:
- Keyboard shortcut:
Ctrl+Shift+U(Windows/Linux) orCmd+Shift+U(Mac) - Menu: View → Output
- Then select tSM Studio from the dropdown
Features:
 Enable automatic scrolling to track latest log entries
The Output panel is invaluable for troubleshooting. Keep it open during initial setup or when diagnosing sync issues.
Tabular Editor
Purpose: Convenient spreadsheet-like interface for working with groups of records.
How to open:
- Right-click on a folder in the Local Files panel
- Select Open Tabular Editor from the context menu

Toolbar Commands
| Icon | Command | Description |
|---|---|---|
| Save All Changes | Saves all modified records | |
| Add Row | Creates a new record for the entity type | |
| Delete Selected | Removes selected record(s) | |
| Clear Sorts | Resets sorting to defaults | |
| Export to CSV | Exports records to CSV format | |
| Export to JSON | Exports records to JSON format |
Editing Workflow
- Click on a cell to start editing
- Double-click on a cell to open a side panel for long text editing
- Orange dot in upper-right corner indicates unsaved changes
- Click Save All Changes when done
The Tabular Editor is ideal for making changes to multiple records at once. Use it for batch updates, data validation, or quick exports.
SpEL Editor
Purpose: Dedicated editor for validating, debugging, and executing SpEL scripts with real-time results.
How to open:
- Open a JSON file containing a SpEL script
- Right-click to open context menu
- Select Edit SpEL Script
Requirements:
- JSON file must have property:
{ scriptType: "SPEL" } - The
contentproperty must contain the SpEL script
Features
Automatic Validation:
- Script is automatically verified when opening the editor
- Syntax errors are highlighted in real-time
Execution:
- Keyboard:
Ctrl + EnterorF5 - Mouse: Click the run button in the toolbar
- Results display in a side window (success or error details)
Toolbar Commands
| Icon | Command | Shortcut | Description |
|---|---|---|---|
| Execute SpEL Expression | Ctrl+Enter / F5 | Runs the script and shows results | |
| Select SpEL Microservice | - | Choose which microservice to use for execution |
Current Microservice:
The selected microservice is also visible in the status bar:

Use the SpEL Editor to:
- Test expressions before deploying to production
- Debug complex scripts with immediate feedback
- Experiment with different microservices
- Validate syntax and logic
Git Integration
Initializing Git (git init) in your local storage folder provides powerful version control capabilities for your tSM configurations.
Benefits
Multi-Server Management:
- Store data from individual servers in separate branches
- Keep each server's configuration isolated
- Easy switching between server contexts
Version Control:
- Save backups in commits for each server
- Return to previous configurations if needed
- Track who changed what and when
Migration Workflows:
- Merge branches to prepare for data migration
- Compare configurations across servers
- Test migrations in feature branches before applying
Recommended Branch Strategy
Workflow:
- Main branch - Keep clean with default/template configuration
- Server branches - One branch per server (e.g.,
server-prod,server-dev) - Migration branch - Merge multiple server branches for complex migrations
- Feature branches - Test configuration changes before applying
Always commit after successful synchronization. Use descriptive commit messages like:
"Sync from PROD - 2026-01-23""Updated listing configurations""Added new process definitions"
Configuration
Server Management
Configure your tSM server connections for backup and synchronization.
| Setting | Description |
|---|---|
| Display name | Any suitable name for the server. Used only for display within the extension. |
| Server URL | Complete server address including https:// |
| Username | Login name (must be registered on the server) |
| Password | Securely stored in VS Code secure storage |
| SSL Certificate (optional) | Required only if the server uses a self-signed certificate |
Passwords are stored securely in VS Code's credential storage. Never commit credentials to version control.
Sync Targets
On first launch, the extension automatically creates .tsm/.tsm-sync.json to store synchronization configuration.
Configuration Structure
Each target is a JSON object with the following properties:
{
  "folder": "Config/Listing/ListingProfile",
  "entity": "ListingProfile",
  "active": true,
  "priority": "", // optional
  "searchLimit": 3500, // optional, default 10000
  "maxSizePerRequest": 200, // optional, default 5000
  "filenamePattern": "<listingCode>/<code>-<userId>", // optional
  "filtering": [ // optional
    {
      "field": "code",
      "value": "Test",
      "operator": "eq"
    }
  ],
  "ignoreDiffProps": [ "nextSendExec" ] // optional
}
- Basic properties - Edit through the configuration panel UI
- Advanced properties - Edit directly in
.tsm/.tsm-sync.json
Property Reference
Required Properties
folder (Folder Path)
- Specifies the local storage path for the entity
- Created inside the
environmentsfolder - Allows logical grouping of related records
entity (Entity Type)
- Must exactly match the Entity Type name on the server
- Requires
/pageAPI endpoint to exist - Verify availability through tSM Public API
Entities without a /page API will cause errors (404, 403) during synchronization!
active (Boolean)
true- Include in synchronizationfalse- Temporarily deactivate without removing from config- Allows flexible control of sync scope
Optional Properties
priority (String)
- Controls upload order to server
- Lower values = earlier in queue
- Only needed for special cases with strict ordering requirements
Use only when upload/deletion order matters for data integrity. In most cases, leave empty.
searchLimit (Number)
- Maximum records downloaded per entity type
- Default:
10000 - Adjust based on server capacity and data volume
maxSizePerRequest (Number)
- Records downloaded per iteration
- Default:
5000 - Reduce if encountering timeout errors
If you see timeout errors, gradually reduce maxSizePerRequest until stable. Find the sweet spot between speed and reliability.
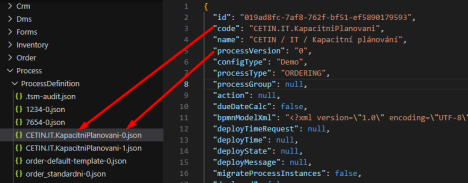
filenamePattern (String)
- Template for generating unique file names
- Use when
<code>values may repeat - Supports property placeholders and path separators
Examples:
Simple pattern with version:
{
  "folder": "Process/ProcessDefinition",
  "entity": "ProcessDefinition",
  "filenamePattern": "<code>-<processVersion>"
}
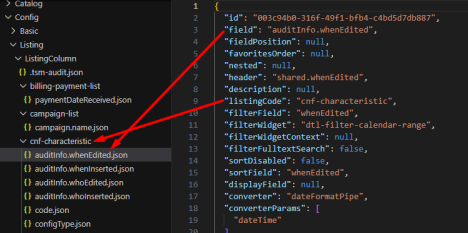
Pattern with subfolders:
{
  "folder": "Config/Listing/ListingColumn",
  "entity": "ListingColumn",
  "filenamePattern": "<listingCode>/<field>"
}
filtering (Array)
- Download only records matching filter criteria
- Multiple filters applied sequentially
- Uses standard filter operators (
eq,ne,gt,lt, etc.)
ignoreDiffProps (Array)
- Property names to ignore when detecting changes
- Prevents marking files as modified for specified properties
- Useful for timestamps, counters, or other auto-updated fields
Ignore properties like lastModified, executionCount, or other system-managed fields that change frequently but don't represent meaningful updates.
Backup and Synchronization
Starting a Sync
To initiate data synchronization, click:
- The
 icon in the Diff Cache panel, or
 - The "Connected: ..." text showing your active server
Workflow
1. Data Download
- Extension downloads current data from the active server
- Progress shown in Output panel
2. Difference Analysis
- Data is compared with local storage
- Changes are displayed in the Diff Cache panel
3. Review Changes
- Examine what's changed
- Verify updates before applying
4. Apply Changes
Choose one of these actions:
| Action | Icon | Description |
|---|---|---|
| Save to Local | Accept server changes and update local files | |
| Upload to Server | Push local changes to the server |
Operations can be performed on:
- Entire list - Use toolbar buttons
- Individual records - Right-click for context menu
Context Menu Operations

Right-click any file to:
- Download/upload individually
- View in compare mode
- Exclude from sync
- Delete locally or on server
Comparing Changes
Click any file in Diff Cache to open compare mode:
- Left side: Local copy
- Right side: Server version
- Highlighting: Added, removed, and modified lines
Change Indicators
Each file shows an icon indicating its status:
| Icon | Status | Description |
|---|---|---|
| New | Record exists on server but not locally | |
| Modified | Record changed since last sync | |
| Deleted | Record removed from server | |
| Filtered Out | Record no longer matches filter criteria |
A "Filtered Out" status means the record still exists on the server, but changes to it prevent it from passing the filter configured in your sync targets.
Best Practices
Before Uploading to Server:
- ✅ Review all changes in compare mode
- ✅ Test configurations locally if possible
- ✅ Commit changes to Git
- ✅ Have a backup/rollback plan
After Successful Sync:
- ✅ Commit to Git with descriptive message
- ✅ Clear the cache if no further changes needed
- ✅ Document significant changes
Always be extra cautious when uploading to production servers. Consider testing changes in a development environment first.
AI Capabilities
tSM Studio provides powerful AI integration through Copilot Chat and MCP (Model Context Protocol) server support.
Copilot Chat Integration
No setup required - Ready to use immediately after installing tSM Studio.
Available Commands
Use @tsm to invoke the chatbot with these commands:
| Command | Purpose | Example |
|---|---|---|
@tsm /autocomplete | Auto-complete SpEL expressions | Get suggestions for partial code |
@tsm /execute | Run SpEL expressions | Execute and see results |
@tsm /validate | Validate SpEL syntax | Check for errors before running |
@tsm /docs | Query tSM documentation | Ask questions about features |
@tsm /guide | Get chatbot help | Learn available commands |
Simply type @tsm /guide in Copilot Chat to see all available commands and usage examples.
MCP Server (tsm-mcp)
Purpose: Extends tSM Studio capabilities to any MCP-compatible chat interface.
Server URL: http://127.0.0.1:32000/
The MCP server starts automatically when you open tSM Studio and stops when you close it.
Supported Transports
- SSE (Server-Sent Events) - Legacy transport:
/sse - Streamable - Current standard:
/mcp
VS Code Chat Configuration
Step 1: Create configuration file
Create .vscode/mcp.json in your project folder:
{
  "servers": {
    "tsm-mcp": {
      "url": "http://127.0.0.1:32000/sse"
    }
  }
}
Step 2: Configure in VS Code
Open chat settings and configure the MCP server as needed.

Step 3: Activate tools
Enable individual tools in the MCP tools panel:

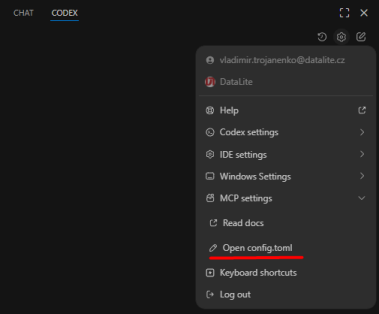
Codex Integration
Configuration file: .codex/config.toml
Add this configuration:
[mcp_servers.tsm-mcp]
url = "http://127.0.0.1:32000/mcp"
Other MCP-Compatible Clients
The setup process is similar for other applications that support MCP:
- Find the MCP configuration section
- Add server endpoint:
http://127.0.0.1:32000/mcp(or/ssefor legacy) - Enable desired tools/features
- Ensure tSM Studio is running
Remember: The MCP server only runs when tSM Studio is active in VS Code. Make sure to open the extension before using MCP features.
Use Cases
Development:
- Auto-complete SpEL expressions while coding
- Validate scripts before deployment
- Quick documentation lookup
Debugging:
- Execute SpEL expressions in context
- Test different scenarios
- Troubleshoot configuration issues
Learning:
- Explore tSM APIs through conversational interface
- Get code examples and best practices
- Understand complex features
Combine MCP with the SpEL Editor for a powerful development workflow: use chat for exploration and quick tests, then refine in the SpEL Editor.